| Al's Photoshop Tutorial | Advanced Concepts |
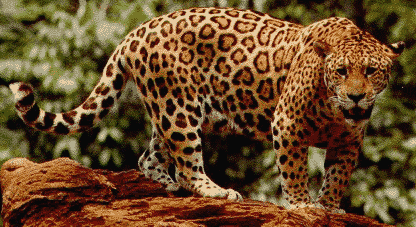
Okay, enough sissy stuff. Now we come to the nasty guts of procedural effects. What we need to learn to do here is how to visualize a pattern, and decide how to make a process to simulate it. This involves a lot of backwards thinking, and a good knowledge of what the filters and effects at your disposal do. As usual, I think the best way to illustrate this is by example, so I'm going to try to describe and walk through an effect here that I've never tried before, taking snapshots at every step, and explain my thought process as I go along. Look at this nice kitty:
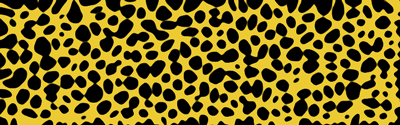
What I'm going to attempt to do is make a pattern similar to that you see on the side of this jaguar's midsection. First, let's examine it and try to describe what we see. Basically, it's a flat yellowish-orange with fairly evenly-spaced spots of deeper orange, bordered with splotchy black. Some of the larger spots also have dots in the center.
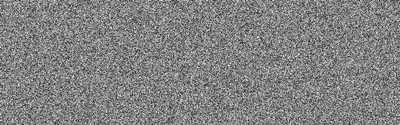
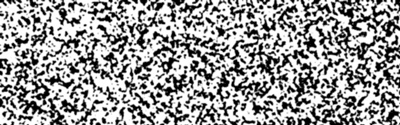
I'm going to start with a new 800x150 (shown here at half that) RGB color image. I've filled it with 50% Gray and added 128 monochromatic noise. This gives us a full random spread of values.
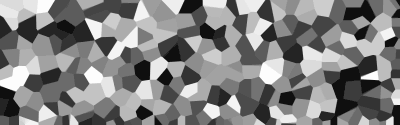
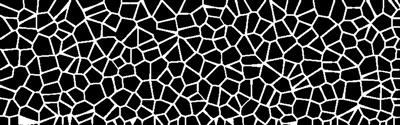
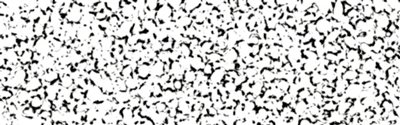
Now, what we need to do is find a way to get an array of evenly-spaced spots. A little trickery with Crystallize and Find Edges is good for this. Here, I've applied Filters » Pixelate » Crystallize with a Cell Size of 40 pixels.
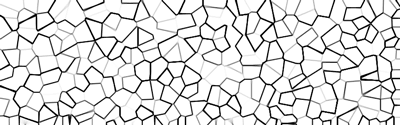
Now, We isolate the edges. These edges will soon define the gaps between our spots. The effect Filters » Stylize » Find Edges has no options.
Now, I'm going to use Image » Adjust » Invert so I'm working with white lines on black, and then Image » Adjust » Levels, and dragging the right histogram arrow all the way left, so all the midtone grays are turned solid white.
Now, we can use these lines to define our spots by applying a blur. I'm using a 5-pixel Gaussian Blur. This blurring action rounds out and spreads these lines, so we can focus in on them later to define our spots. The wider the blur, the more rounded the spots will be, but if we blur too much, the spots will start to bleed into each other, or be lost totally.
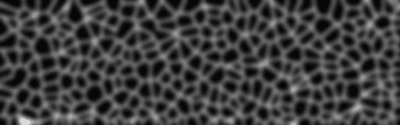
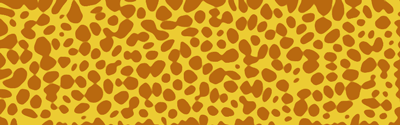
Now we can use Levels again to focus in on our spots. Use a very narrow band somewhere in the large bump in the histogram you'll see. The farther you go to either side determines the ratio of bright to dark. Mind you, if we stopped here, and added a little distortion maybe, we'd have a damn fine cow pattern. Also note that some of the spots are running together. That's OK, if you look up at the actual jaguar, you can see it's doing that in some places too.
OK, now we have some spots. Let's get the colors right. Looks like it's time to start using some layers. I've made the background into a layer, and made a duplicate, and hidden it. We'll need this duplicate later, when we add the black splotchy rings. I've added a new layer behind our work layer, filled flat with the light orange-yellow color, and I've set the layer mode on our original work layer to Multiply, so the white on that layer shows through to the background color.
Now it's simply a matter of using levels again on the original work layer. We just want to modify the darkest point (the left arrow on the gray scale), and modify this value separatelgy for R, G, and B until we get a nice, rich orange color (Alternately, we could use this to give it some color, any color, and then use the more intuitive 'Adjust Hue/Saturation' to find our orange). We can also add a little blur here to smooth out the spots' edges. Hey, this thing's looking pretty good!
Looks like it's time to start working on the black splotchy rings around the rosettas. Let's call up the duplicate of the raw spot layer we made earlier. Let's make another copy and hide it again, since we'll probably need these raw spots for the center spots later. Set our new working layer to multiply, so we can see our background again. Getting the main part of the ring is simple, we just do Filters » Stylize » Find Edges again, and we get thin, solid rings.

The hard part is making these rings thick and splotchy. Let's think about this for a minute, and look back at the original. The rings we see there don't always completely surround the rosetta, and they're quite thick, but heavily rounded. So, what we need to do is expand our rings outwards, break them up, and round them out. Expanding outwards is easy. We just need to add a little blur (2 pixels of Gaussian in this example) and use Levels to narrow its band a little.
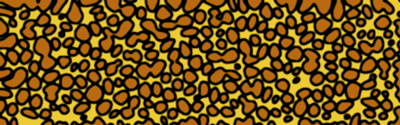
Now we need to break apart the rings some. Again, this can be done with noise. What we need here is a mask of white in a random pattern to go over these rings, so only about half of the total ring will show through, in splotches. I'm going to add a new layer above all our working layers, and fill it with 50% gray, and give it the same noise as before. I'm going to blur this 2 pixels (the same value as the one I applied to the rings, so the width of the rings and the width of this breakapart mask will be close), and then use very, VERY narrow values in Layers to get about a 50/50 mix of white and black. So narrow, in fact, that I have to blur it out just a bit to make it smooth again.
Now, all I've done is turned the layer with the rings to "Normal" mode, so it's solid, and I've turned the white noise mask above to "Screen". In effect, now the rings show through only where our mask was black, thus breaking up the rings. These two layers should now be merged, so they work as one.
Here, all I've done is turned our new broken-rings layer back to Multiply mode, so we can see the spots behind it. I've also used Levels to make these spots a bit darker. Looks like we're getting pretty close!

It's just a matter of expanding and smoothing out these rings now. I've blurred them 1.5 pixels, and used narrow levels to focus in at a good rate. Again, the placement of the focus on the histogram controls how much dark and light we end up with.
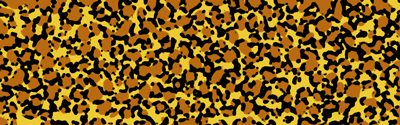
This is looking pretty good. I haven't figured out a good way to do the center dots yet, but I don't think that it's all that important, so until I do, I'll call this done.
The nice thing about making patterns this way is that they can usually be easily made into actions. This means that they can be put into a custom command in the Actions window, and used quickly when needed. I've put all the above steps (with a few minor tweaks and changes) into an action file for you to download here. Go ahead and try it on a nice, large, blank RGB image.
| Back: A Simple Starfield | Home | Skip Ahead: Detailed Surfaces |