| Back: Create a Sketch | Home | Next: Setting Up Layers |
| Al's Photoshop Tutorial | New Course (Versions 7.0 and above) |
Before we go any further, let's learn a little about how computers think about color. Although light exists in a broad spectrum, human eyes can only see a limited range, and they compress the visible spectrum down into three primary colors. So, when we designed printers, computers and monitors, we only worried about reproducing a color to look the same to our eyes, and not about reproducing colors in their true nature.
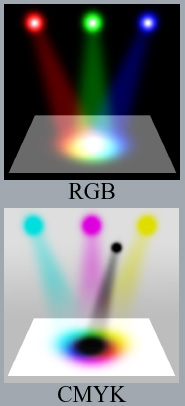
There's two basic ways of reproducing color. One way, used by light-based systems such as monitors and projectors, deals directly with the three true primary colors: red, green and blue. Under this method, light is projected onto or from something in varying shades of these three colors. Where no light is seen, we see black. Where all three colors shine at their full brightness, we see white. In Photoshop, this is called "RGB Color".
Another way of reproducing full color is used by printers and inks, where we start with something white (like a sheet of paper), and subtract the primary colors from it. Here, our colors are Cyan (the absence of red), magenta (the absence of green), and yellow (the absence of blue). Due to the nature of ink and light, the combination of cyan, magenta and blue don't always appear to be true black, so it's common to also have a channel for black ink. In Photoshop, this is called "CMYK Color". Yes, the "K" stands for black, because "B" already stands for blue. If you use this method, Photoshop will be thinking of your colors in these four channels, but of course it will still be translating them to RGB for your monitor.
Okay, time to start mangling the sketch! We want to change the color of the sketch to light blue,
so that there's no way we can confuse the sketch with our final linework when we start it, which
will be done in black.
We're going to work in RGB color, so the first thing
to do is to go into your "Image » Mode" submenu, and make sure that "RGB Color" is
selected. You'll also see "Grayscale" and "CMYK Color" in this submenu, as well as other less
common methods of color.
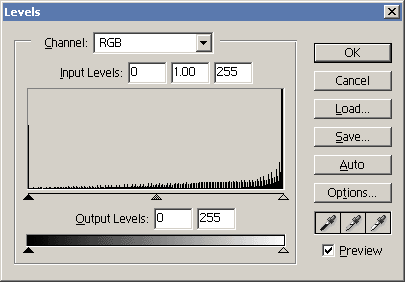
Go into the menus to Image » Adjust » Levels. This should bring up the Levels editor. The "Channel" selector indicates weather the levels you're looking at and editing is one of the three primary color channels (Red, Green, or Blue), or all of them together (RGB, the default). It keeps separate level settings for each of these four channels. The interesting-looking graph below that depicts how common the shades of the selected channel are, ranging from 0 (dark) on the left, to 255 (bright) on the right. Since a sketch is white paper with some gray marks, the graph should show the levels clumped up towards the right, as in the screenshot here. If your scanner scans paper as light gray and not true white, the clump will not be up against the very edge.
The main controls in this panel are the three arrows under the graph (the input arrows), and the two arrows under the gradient below them (the output arrows). Play around with these arrows to get a feel for what they do. The input arrows define where on the scale black, white, and 50% gray lie, and the output arrows define how white the brightest white can be, and how dark the darkest dark can be. A good example of their usefulness is if you do have a scanner that sees paper as light gray, you can move the rightmost input arrow just to the left of the large clump on the graph. This will tell Photoshop that you want to lighten the image so that this clump (the paper) will be true white.
If you have changed the levels in a way you're not happy with, hit "cancel" and then get the levels editor back up again. We're going to use the levels editor to turn the sketch a light blue. I do this because the gray of pencil can obscure some of the details of the black ink, and dark smudges cannot slip by as easy if they don't blend in with the sketch color.

Here's how to make it blue: First, go to the "Channel" selector and select Blue. You'll want to make it so that blue is all light, so grab the dark output arrow (the one on the lower left) and drag it as far to the right as it will go. The gray lines on your sketch should turn a deep blue. This happened because there is now as much blue light in the dark lines as there is in the white paper.
Now select the Green chanel and drag its dark output arrow about halfway up. The blue lines should turn even lighter, and start to look sort of like they were drawn with a non-photo-blue pencil. If it's still too dark for your taste, you can drag it farther up, and even drag the red dark output up some. It should look something like the image to the left. There are other ways, even easier ways, to get the sketch blue, but it will help a lot if you familiarize yourself with the Levels editor, which can be very useful at other steps in the process, or even to do things like brighten up a final picture that is too dark.
| Back: Create a Sketch | Home | Next: Setting Up Layers |