
| Al's Photoshop Tutorial | New Course (Versions 7.0 and above) |
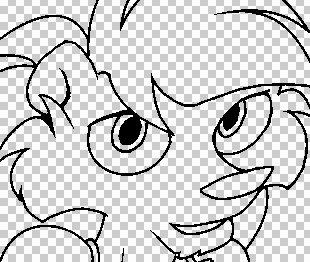
Okay, here she is, all inked. You can click the small version to see the full-resolution one.
As you can see, I've turned off the sketch layer. You should do this too, either by just making it invisible by clicking its icon, or, since we don't really need it anymore, we can delete it from memory by selecting its layer and choosing "Delete Layer" from the layer window menu.
Now let's get our color layer prepared. Select the Ink layer and then go into the layer window menu and chose "Duplicate Layer". Make a duplicate layer and name it "Color". Turn off all other layers but this one, and the background should go transparent (checkerboard). Now we'll want to remove all the shades of gray around the black lines so that we can easily color with flood fills, but technically right now they are not shades of gray, they are black with varying shades of transparency. If you try to do anything with levels now, all it will see is black.
So, let's replace transparent with white. Select "Edit » Fill" from the menus, and give it
these settings: Use: White, Opacity: 100%, Mode: Behind, Preserve Transparency: No.
The "Behind" mode lets it know that the color we're filling will go behind the contents already
in the layer. Hit "OK" and the layer's background should be filled with solid white.
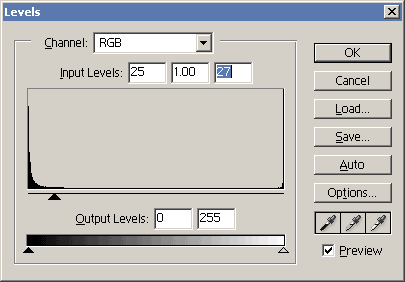
Now let's take a look at the levels (Image » Adjust » Levels). You'll notice that the center of the graph has a little presence, but there are large clumps at either end. This means that there is a lot of true black and white, and a lot of near-black and near-white, and a few midtones. We're going to move our input arrows in to a point on the left where the near-blacks taper off, so we're getting true black plus a little bit more. As we do this, you should see the linework get thinner and more jagged as we clear out the midtones. Hit OK when it's good.
Now, some of the in-betweens may still survive, and you will definitely still have
a solid background. We can get rid of both of these in one step. Be sure Black is
still your foreground color, and go into the menus to "Select » Color Range". With
fuzziness set to 0 and Invert turned on, this should select everything but black.
When it is selected, hit "Edit » Clear" (or Delete on the keyboard) and then
"Select » Deselect" (Ctrl+D on the keyboard).
The color layer by itself should now be black on transparent again, but with no pixels of varying transparency, giving its lines a sharp and jagged feel. We still have the ink layer with the nice, smooth-looking edges, but it is invisible now and will be turned on again later. We separated these layers so that the color we apply does not have to compensate for the smooth edges, and we will be able to change colors easily in the finished product easily if we need to. We are now ready to apply some color!
| Back: Inking | Home | Next: Flat Coloring |