| Back: Transparent Surfaces | Home | Next: It's Done! |
| Al's Photoshop Tutorial | Advanced Concepts |

This technique is good for any fur you want that doesn't have a toony
outline around it. So, how do you make thick, properly transparent fur?
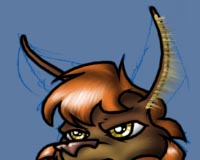
Why, you grow it, of course. To the right, you can see I've made turned on
the sketch so I can see where the planned limits to the ear are, and have
placed a seeding area along the side of the ear, that has been swept with
a black airbrush as well for a little variance. This is on a new layer
up above all the others.
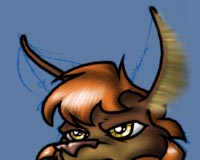
Now we get a good, thick multi-point brush and start dragging the hair out
with the smudge tool, just like the other fur textures we've been doing, but
with "Preserve Transparency" turned off so it drags out into new areas.
It sometimes helps, for thicker fur, to keep a duplicate layer of your seeding
area so you can do more passes, and also once you have some fur growing the
way you want, to duplicate and re-merge the layer with the fur on it to make
it more visible.
Here, I've used a new layer to add a base color with the airbrush behind the
denser fur, so it looks really thick. I've also gone over the fur layer
in "Preserve Transparency" mode to give it some texture.
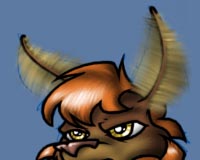
Now it's just a matter of repeating the process for the other parts of the
ears, and erasing the stuff that overlaps improperly.
| Back: Transparent Surfaces | Home | Next: It's Done! |