| Back: Shiny Hair | Home | Next: Transparent Fur |
| Al's Photoshop Tutorial | Advanced Concepts |
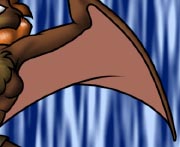
This kind of surface is relativley easy. Setting up, I've turned the wing
color's Opacity back up to 100% so we can see what we're doing. I've also
made a high-contrast background so the transparent effect will be more
obvious while we're doing it. To get things ready, I've made two new layers
for the wing's shade and highlights, in the same style as the other shade
and highlight layers, but that only apply to the wings.

Here I've simply airbrushed in my shades and highlights, and I've merged the
three wing layers into one so we can start messing with transparency.
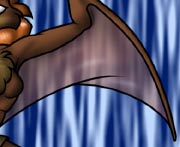
Instead of hiving the wing uniformly transparent, I decided I wanted it to look thicker nearer the body and thinner out at the edges. To do this, I've turned on the layer mask with Layer > Add Layer Mask > Reveal All. Airbrushing this mask now affects the layer's transparency locally.
Next, we'll finally get around to doing the fluffy ear things!
| Back: Shiny Hair | Home | Next: Transparent Fur |