| Al's Photoshop Tutorial | Old Course (Versions 4.0 through 6.x) |
Natural Light Shading
If you're doing an outdoors scene, there is a quick trick to giving your character
some more natural lighting. Outside on a clear day, direct sunlight is what is called
warm light, which is light that tends to lean towards yellow or orange. Ambient light,
usually reflected from the sky, is cool light, leaning towards blue.
If your shade layer is done the way I did in step 8, it should be a multiply layer that
is fully opaque over your character and fully transparent elsewhere. Now, we'll make it
so that the light tones on this layer are from direct sunlight, and the darks are from
ambiance. Using Edit » Adjust » Layers, we can turn the lights warm and the darks cold.
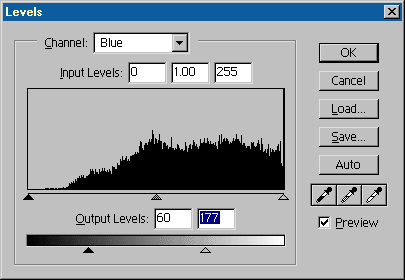
Select the Blue channel. The output arrows (down at the bottom) should both be brought
in. Moving in the left one towards the right will make the darkest shade of blue
available to the layer lighter, which will add blue to the dark areas. Moving the
right arrow towards the left takes blue away from the lightest available colors, making
them yellow. Doing the same thing to a lesser extent on the Green channel will nudge
the warms closer to orange, and the blues closer to cyan.
You can do the same thing to the highlight layer to make the highlights more warm, but
do NOT bring up the left arrows, or else you'll give your character a strange blue
glow. This happens because the highlight layer adds itself to the image, and if you
increase the lowest possible level to dark blue, a slight blue shade will be applied
to even the darkest areas.
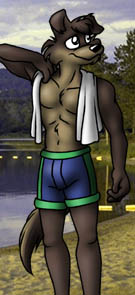
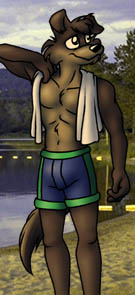
For the purposes of this demonstration, I've inserted a photo of a lake in the
background, and below I have the wolf with and without this effect applied. The one
without it looks very blue and washed out.
Without Natural Light Shading:
 |
With Natural Light Shading:
 |