| Back: Backgrounds and Effects | Home | Next: Saving in .JPG |
| Skip Ahead: Advanced Concepts |
| Al's Photoshop Tutorial | Old Course (Versions 4.0 through 6.x) |

Well, would ya look at that, we've got a completed picture. There's one small problem, it's a 2.9 megabyte, 593 by 1076 pixel Photoshop image. How do we make it a nicely sized image like the ones I've been using on the sides in this tutorial all along?
Users of Photoshop version 5.5 and above have it easy. There is a new menu option called "Save for Web" that makes these distribution formats truly simple. If you have this version and know little about the formats, I suggest you read about them below, and then take a look at my comments on Save for Web.
Otherwise, you need to do a few things by hand, but it's still a fairly painless process. First, make sure you've saved your work in a .psd file. We're going to reduce the quality of the image significantly, so do NOT save again with the same filename. To ensure I don't overwrite my main file accidentally, I usually copy it to a new buffer. This is done by selecting Image » Duplicate in the menus, giving it a new name, and checking the "Merged Layers Only" box. Checking that box will combine all the layers into one flat image for the new buffer, signifigantly decreasing the amount of data Photoshop needs to deal with. You should now have a second window with a copy of the image, so feel free to close the old one for safe keeping.
For Internet distribution, resolution can be a lot less than what's usually expected
for print resolution. In fact, since many people still connect to the Internet with
relatively slow modems, it's common courtesy to keep your filesizes small, and keeping
your final resolution down is a good way of doing this.

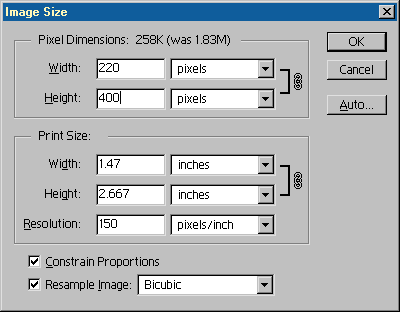
To resize the image, go to Image » Image Size, and you should get a requester like the one to the left. I usually don't let files intended for Internet distribution get any larger than 800 pixels wide or 600 pixels tall. Images intended for use on web pages should be much smaller still. Just worry about the pixel dimensions now; the Print Size settings cannot be saved in most distribution formats.
There are many image formats widely in use today, and each format has its own
advantages and disadvantages. Most formats use some sort of compression, which gives
the advantage of smaller file size at the expense of image quality.
By the way, for anyone who'd like to see the inner workings of my demo picture and has lots of bandwidth to spare, I'm making its entire final Photoshop file available here. It was made on Photoshop version 5 for PC, but works equally well on Macintosh, and also will work in version 4, but will convert its text layers to bitmap layers. It's compressed, so you'll also need a program like Winzip to unzip it.
| Back: Backgrounds and Effects | Home | Next: Saving in .JPG |
| Skip Ahead: Advanced Concepts |