| Al's Photoshop Tutorial | Old Course (Versions 4.0 through 6.x) |
This command makes saving for the web easier, gives you a real-time preview, and protects against accidentally deleting your original Photoshop file. I recommend reading over the benefits and drawbacks of GIFs vs. JPGs to understand what the formats do to your picture, although most of the options they talk about are a bit more automated here.
After reading that, go ahead and, with your full Photoshop file loaded up, go to File » Save for Web. A rather huge window should pop up, but despite its many gadgets, it's an easily functional window, which I've broken up here and am going to explain piece by piece.
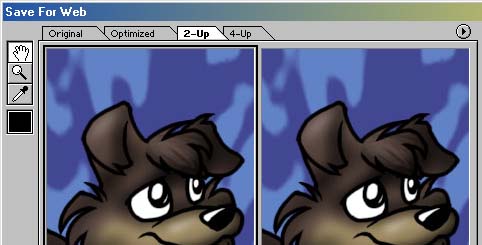
This is the top left corner of the window. Here we see some common tools on the left (pan, zoom, color picker, and current color) and a number of tabs on the top (Original, Optimized, 2-Up, 4-Up). These tabs call up different displays. I prefer the 2-Up, since it gives you both Original (your Photoshop file as it looks now) and Optimized (how the resulting file will look). 4-Up is the same thing, but displays multiple options for the optimized picture.
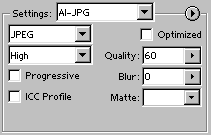
On the right, just under "OK" and "Cancel", we see a settings window. In this snapshot, I've made my own
settings which save JPEG 60%. We have a number of other quality options here that are fairly similar to
those in the dialog boxes presented by earlier versions of Photoshop. The big benefit here is that as you
change these options, the Optimized image will change to reflect them.
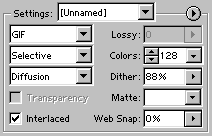
This window is the same one, but with the GIF options displayed. You can see here that (well, if my wolf
pic had any transparent parts, it wouldn't be grayed out) there is now an option to have a transparent
color in a indexed palette. This is great news for web designers! There's also finer control over
dithering, and you can 'lock' colors into the palette. Oh, and there's also an option to snap to
"web-safe colors", but don't worry about that unless you're making your images specifically for a
256-color display.
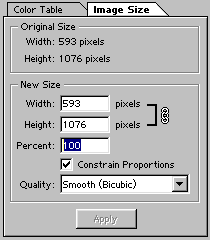
Here we see the window just below Settings. This has the color table and size info. For saving for the web, you'll want to shrink your image down to a good screen resolution. Try not to let the width or the height go much beyond 700 pixels or so. Sometimes resizing with this gadget is intolerably slow, so you might want to save in a different file, and flatten and resize your image yourself, before going to Save for Web.
The Color Table shows up for GIF and indexed PNG formats. It's useful for looking at and changing the colors the computer tries to reduce your image to for these formats. Again, I stress that indexed color images be used primarily for linework and grayscale images, or seriously limited color images.
So, to put this all together, once this window is activated, find a good size for you picture, and then
find a format and quality that gives a good balance between image quality and file size (displayed below
the picture). There's really no reason for a good image to go above 200 kilobytes. If your
distribution images always seem larger than that, review how you save them, because there must be a more
efficient way.
| Back: Making the Image Internet-Ready | Home | Skip Ahead: Advanced Concepts |