| Al's Photoshop Tutorial | Old Course (Versions 4.0 through 6.x) |
GIF is a format originally developed back when home computers often had strict limits on how many colors their screens could show. Even though most home computers are far beyond the limits of those days, limiting the palette of images remains an effective compression method for certain types of pictures. Any image that has large chunks of solid color is likely to be compressed well with GIF, or images that have limited colors like grayscale images. But, like JPG, how you use it can dramatically influence your file size and image quality.
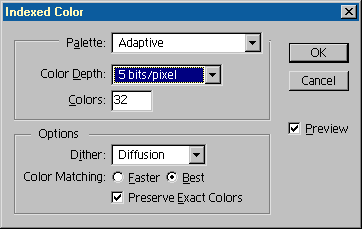
The nice thing about Photoshop is that it can allow you to see, limit, and edit the palette of colors chosen to limit the picture to. Going to Image » Mode » Indexed Color tells Photoshop to convert your image from a 24-bit color image to a limited palette image, and brings up the following window:

Do not fear this window. It is your friend. First off, be sure that the Preview checkbox on the right is on. This will allow you to see effects of the changes you're making to the options as you're making them. Without this box checked, you would simply be guessing.
Under the "Options" part of this window, you'll see an option called Dither. Dithering is the process of having two similar colors mesh in a pattern in order to give the illusion of a color (or colors) in between. Turn this to "none" if your image has no smooth gradients (such as line art, or an unshaded cartoon), and your solid colors will remain solid. Otherwise, turn this to "Diffusion" and your gradients will be interpolated with a random pattern. There is another setting, called "Pattern", which can dither based on an image in the pattern buffer, but that's a very specialized option.
Underneath Dither, always keep color matching to Best rather than Faster, unless you have a dreadfully slow computer. Also, the "Preserve Exact Colors" option provides a more accurate automatic palette than Photoshop version 4 had.
Above, you'll see the "Palette" part of the window. This is usually set to "Adaptive", unless your image has a very small number of colors, in which case it sets itself to "Exact". When in Adaptive mode, you can limit how many colors are used. GIFs with 256 colors tend to be very large, so I recommend experimenting with these options to see what the least number of colors you can have is with the image still looking good.

To the right, you'll see a close-up of a 64-color version of our Wolf. See that patchy
posterization in the shading? That's dither. This is a rather exaggerated example of
why GIFs aren't good for high-color graphics.

Here you see a grayscale version of the same image, with the same number of colors in the limited palette. Since the palette colors are shared between all the nulled hues now, the gradient is a lot smoother.
Once you have your palette set right, hit OK on the Indexed Color window. Go to File >
Save As, and save your file. You'll get one more option box where you can select "Normal"
or "Interlaced". You've probably seen Interlaced images load on the Internet. They start
loading rough and gain detail as it loads. This option doesn't affect filesize much, so
it's pretty much a judgment call.
Photoshop automatically converts grayscale images to 256-color palettes when put into
Indexed Color mode. This is a bad thing! grayscales usually don't need more than 64
colors, and line art can be brought down to 8 or 16 without any noticeable loss in
quality, and your file sizes will be much, much smaller. For line art, it's just silly
to save as JPG, because your file size will be larger, and your image will actually have
less quality! The following examples were saved at 220x400, reloaded, blown up 3x and
cropped.
 |
This is from a JPG saved at quality 5. It's 20 KB, and has visible artifacts (artifacts are the strange errors near the lines caused by lossy data compression). |
 |
This is from a 256-color GIF. It's very crisp, has no artifacts, and is 17KB. |
 |
This is from a 16-color GIF. The edges show an almost unnoticeable amount of banding, but it has no artifacts and is a mere 9KB. |
One GIF feature useful to web design is transparency. Photoshop versions below 5.5 support this only through an image filter. If you want transparency, once your GIF is ready, save it by going to File » Export » GIF89a Export. Here, you'll get a strange requester that lets you select which colors are to be transparent. However, if you do have version 5.5, it now lets you set one of the indexed colors to transparent. This makes things unbelivably easier for web designers and other people who need to work with transparent GIFs.
GIF animation is not directly supported by Photoshop. There is a new program that is shipped with Photoshop 5.5 (or sold separatley) called ImageReady which takes Photoshop PSD files and can create GIF animations by turning the available layers on and off, editing their options, or moving them, but that's getting into an entirley new territory.
| Back: Making the Image Internet-Ready | Home | Next: Save For Web |