| Back: Soft Color | Home | Next: Highlights |
| Al's Photoshop Tutorial | Old Course (Versions 4.0 through 6.x) |
We're going to shade with the help of a layer mode called Multiply. What multiply does is it darkens the layers behind it according to its color. I'll explain it here, but if you're not into the whole geek thing, feel free to skip the next paragraph.
How it works and why it's called multiply becomes apparent with a little computer color theory. For every pixel on each layer, the computer keeps separate values for Red, Green and Blue, which technically it thinks of as a round number between 0 and 255, but for this theory, it thinks of them as a decimal number between 0 and 1 (0 being pure dark, 1 being pure light). As any high-school graduate should know, when two numbers between 0 and 1 are multiplied together, their result is less than either of them, for example any number multiplied by .5 is half its original value. Now apply this to Photoshop layer thinking; anything below a multiply layer that's filled with 50% gray will have only half its original brightness. And since anything multiplied by 0 is 0, anything below a fully dark multiply layer comes out black; and since anything multiplied by 1 is itself, images behind a white multiply layer are unchanged.
Anyway, down to business. Before we start to shade, we'll want to make a layer for it that will have white chunks of color where shading can be, and transparent elsewhere. Select your flat Color layer and duplicate it as "Shade", and then turn all layers off except for the shade layer. Now do the old trick again of removing all the black with Select » Color Range and delete. Deselect, and go to Edit » Fill. Here, we'll turn all the remaining colors to white by using these settings: Use: White, Opacity: 100%, Mode: Normal; Preserve Transparency: On.

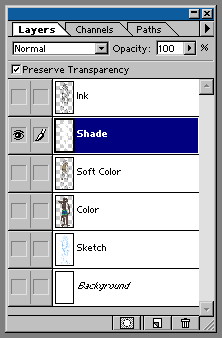
Now, since we want the shading to affect the colors but not the ink, go to the layers
window and drag it up above everything except Ink. There should also be a layer option
near the top labeled "Preserve Transparency". Turn this on, because it will prevent the
shading of going outside the white areas. Your layers window should look something like
the one to the right. Turn your ink and color layers on. When you change the Shade
layer's mode to "Multiply" (done in the box in the top of the layers window that currently
says "Normal"), the colors below should show through unaffected.

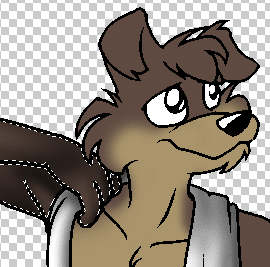
Now you can select black as your color, and use the airbrush tool to start shading, and remember that you can also use the Magic Wand to select some parts without others, which can be used to give objects that are next to each other but not touching some more visual depth.
One technique that I've found useful is to first shade with a very large brush, making general shades, and then selecting smaller brushes later, going back with details. You can also change your color back to white if you've shaded an area too much and need to lighten it again.
If you have a pressure-sensitive Art Pad, there is an airbrush option called Stylus: Pressure that can be turned on, so the harder you press, the more dramatic the shading is. This same effect can be achieved with the mouse by adjusting the Pressure slider in the airbrush options window as neccessary before each stroke.
Another good technique for long hair is to select a very small brush, and with a very
light pressure, stroke the areas where the long hair flows, along its grain, over and
over.
| Back: Soft Color | Home | Next: Highlights |