| Al's Photoshop Tutorial | Advanced Concepts |
| Note: This section was created as a companion to the Old Course tutorial for versions 4.0 through 6.x. Some of the concepts in here can be achieved with much greater ease in version 7.0 with the new brush system, and are covered in the New Course in the page about Smudging For Fur. |
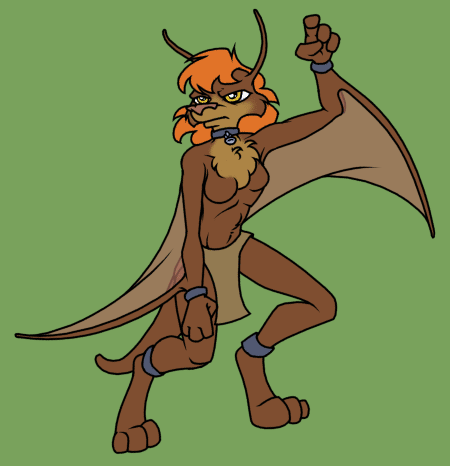
To demonstrate detailed surfaces, I'm going to start using a new picture. The picture I'll be working on here is of a bat, which has a lot more varied and interesting surfaces than the wolf I used in the main part of the tutorial.
I've taken the liberty of skipping the boring part of inking and flat-coloring this image. If you haven't read it already, go back and read up on Step 1 through Step 7, since I'm skipping up to that point here. Here's what we have so far:

Yeah, the ears look a little freaky as it is now.. but eventually we'll add the fine-haired meat of the ears that bats have, so it should (in theory) look a lot better when we're done. Other surfaces to note are the transparent wings, soon-to-be-shiny leather bands, thick fur (on the chest) as well as thin fur, eyes with irises, and long hair.
All these strange surfaces can make bats complicated critters to draw. I decided to make the wings more realistic in that they're actually attached to her arms rather than sprouting off the back like so many other bats I've seen people draw, but also less realistic in that they don't have bony structures going through them, since those are simply ugly. This poses another artistic problem, that since the wings connect broadly to the sides, it's pretty hard to find a top that stays on. I couldn't figure it out. Apparently she couldn't either. Maybe that's why she looks so pissed off.

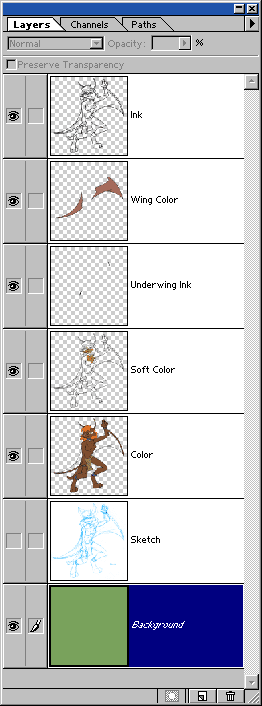
Let's take a look at how the layers are set up, just so you know where I'm starting from. I've blown the preview pics to full size so you can kind-of see what's on each layer here. Starting from the top, we see the Ink layer, which is pretty standard except a couple snippets of ink that are behind the transparent wings are not present. Below this, we see a layer dedicated to just the wings, which has a solid color, with the layer opacity set to 70%. Right under this are the ink snippets that go behind the wing. You can see on the large image above the result of this effect, where the wing goes over both the color and the ink of her far right hip.
Then come some more standard layers. You see we have the soft color layer, which just has the lighter brown fur color for her face and chest, followed by the normal color layer, which you'll notice has no color given for the wings, since their color is in its own semi-transparent layer. After this, there's a deactivated sketch layer, and then the flat green background layer.
In the next step, I'll start making the detailed surfaces, starting with the
simplest ones.
| Back: Advanced Concepts | Home | Next: Simple Detail |