| Al's Photoshop Tutorial | New Course (Versions 7.0 and above) |
Step 10-A: Smudging For Fur
This step is going to get very complicated. If you feel intimidated by it, and don't feel any pressing
need for extra fur texturing, feel free to skip ahead to the next step. For this step, we're going to
completely demolish our existing layer structure. I recommend saving, and then using
"File » Save As" now to save our progress from here on in to a different file, since we'll be
mashing all our color and shading layers down into one.
So let's do that now. Make all your layers invisible except for the ones between the background and the
ink layer. In my case, that's "Highlights", "Shade", "Soft Color", and "Color". When this is ready,
go to the layer window menu and select "Merge Visible". These layers should all compact down into one.
Let's rename it "Final Color". What we're preparing to do is smudge around the image data in this layer
to create a fur effect. Let's take a look at what the Smudge Tool does.
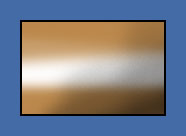
Here's a sample image I'll be playing with. Imagine that this is a useful part of fur or hair or
something like that. The blue is on the background, and everything else is on one layer.

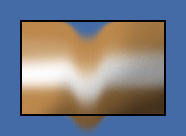
Here, I've taken the smudge tool and smudged down the middle. It took everything with it. This isn't
what we want at all. We want our linework to stay.
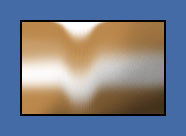
Now I've gone back, moved the border to its own layer and smudged again. Now we see that the smudge is
taking transparency from beyond the border inside, and colors from inside to the outside. That won't do
at all.
Now I've locked the transparency on that layer. It won't take any colors from inside to the outside
anymore, but where it can't drag colors in, it's assuming the background color (white). This is another
step towards what we want, but it isn't quite there yet.
Looks like we'll have to resort to some trickery. What we need is a way to have colors from the borders
of the smudging are be able to sweep inward, and the transparency to be locked to keep colors from
seeping past the borders. The first thing we need to do is to move our black off the Final Color layer,
since we don't want black smudges by all the edges. Select the Final Color layer with all other layers
turned off, and do another "Select » Color Range" for black. Delete the selected black from that
layer, but don't deselect it yet. Remember that there's a little bit of not-quite-true black from the
ink layer in that black. Make your ink layer visible, select it, and use Fill to fill your selection to solid
black on that layer.
Now we're going to separate out the areas we will smudge from those that we won't. Make all layers
invisible except for "Final Color" again. We should see large chunks of shaded color floating on
transparency. Make a duplicate of the "Final Color" layer. Call one copy "Fur Color" and the other
"Non-Fur Color". Now we're going to want to get rid of the non-fur parts from "Fur Color" and vice-versa.
To start this, we're going to Ctrl-Click on either of the layers -- this will transfer that layer's
transparency into our selection shape. Marching ants should appear around all the pieces. Now we're
going to select "Edit Quick Mask Mode", the icon in the toolbar just below the foreground/background
colors, on the right. In this mode, we can paint directly on the selection.
 Things show up normally if they're selected, and in a red tint if they are not. We're going to take our
Paint Bucket tool and fill all the non-fur parts with black, to exclude them from the selection.
They should turn red as you do this, and start looking like the image to the right.
Things show up normally if they're selected, and in a red tint if they are not. We're going to take our
Paint Bucket tool and fill all the non-fur parts with black, to exclude them from the selection.
They should turn red as you do this, and start looking like the image to the right.
Once we have it, click the icon to the left of the Quick Mask icon ("Edit In Standard Mode") to return
to normal. Your marching ants should only be around the fur areas now. Once only the fur parts are
selected, select your "Non-Fur Color" layer and clear. Then select the "Fur Color" layer, do "Select
» Select Inverse", and clear again. Now all the colored chunks should be on their appropriate layer.
So what we need is a way of extending the color data a little beyond the edge of the are we'll be smudging.
We're going to do this with something called a "Layer Mask". Here's what we do: Make a duplicate of the
"Fur Color" layer (just let it be called "Fur Color Copy") and leave it where it is, directly above the
layer it copied. Now select "Fur Color" (the one on bottom) and do "Filter » Blur » Blur
More" on it, twice. Still on that layer, do "Layer » Add Layer Mask » Hide All". Notice
that a black second thumbnail appears in this layer's entry. This is the mask's thumbnail. The link
icon between the two thumbnails means that any action applied to one may be applied to the other. Click
this link and make it go away. We don't want our mask smudged when we start smudging.
The idea behind all this is that we want to keep the data we had just blurred out past the edges, but
restrict what we see to what it was. Select the lower layer's mask (the icon near the layer will be
a circle to denote the mask instead of a brush). Ctrl-click on the layer copy to get its transparency
as a selection, and then do "Image » Adjustments » Invert". This should have made the
mask icon change, and show the shapes of the layer. Select the copy layer above, and do a Merge Down
(in the Layer menu). It will ask what to do with the mask; tell it to "Preserve" it. Once merged,
be sure you lock the transparency on the image side of the layer.
Ugh! What a horrible process! And it was very non-visual, so I apologize for the lack of screenshots.
But, if we did everything correctly, we should be set go smudging all willy-nilly. Turn on all your
layers again so we can see what we're doing, and select the image part of the Fur Color layer. Select
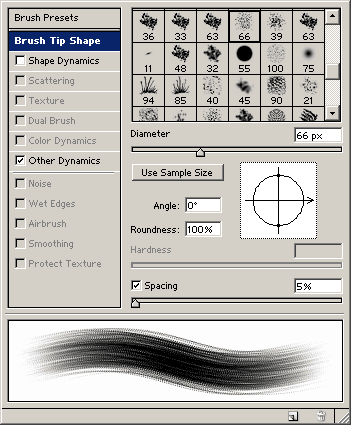
the Smudge tool (in the icon set just below the eraser tools). Give it a brush with lots of bristles,
like the one shown to the left. If you've got a pressure-sensitive drawing pad, set its Strength Control
to Pressure -- if not, keep the Strength (in the Tool bar) fairly low. Now, just start making strokes
up and down in the direction of the fur. Use something with thicker bristles for longer-looking fur.
This can be a really powerful effect, and I think you'll agree that it was worth all the effort.
When we're done, if we want to add a little emphasis on the fur, we can run "Filter » Sharpen
» Sharpen" once or twice to bring out the detail. Don't use it too much or the noise will start
to show through as well. We can also merge the Fur Color and Non-Fur Color layers back into a single
Final Color layer, if you wish. We've come a long way, but despite all this work, we still haven't done
anything for a background. That's coming up next.