
| Al's Photoshop Tutorial | New Course (Versions 7.0 and above) |
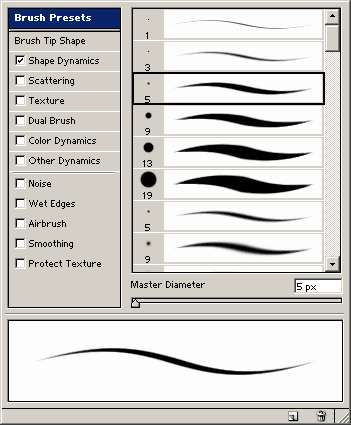
Now we're going to learn about Photoshop's system for Brushes. This is new territory in version 7.0, and very different from how it used to be. To open the brushes window, make sure you've got the Brush tool selected, and then click on the Brushes tab. The default place for this tab is in the top-right corner of the screen, next to the tool options, and looks like this:
Something like what you see to the right here is what should pop up. On the bottom, you have a preview of what a stroke with the current brush would look like. Each option in the window on the left that's in a notch has its own page of options, which opens to the right. In this case, I have the Brush Presets tab selected.
There's not much to this part. The Brush Presets is a place where you can store and recall brushes
you commonly use.
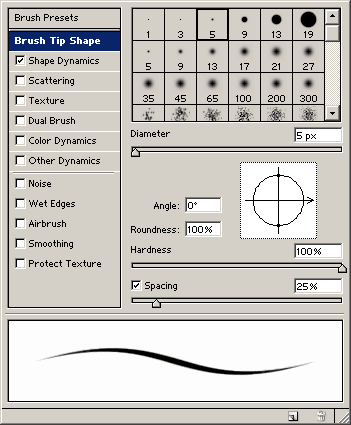
Here we see the Brush Tip Shape panel. Here, you can select one of the existing brush shapes, or
make your own. You can define round brushes by adjusting the values for Angle, Roundness and
Hardness (Hardness controls how solid the edges of the circle are, with 100% being solid, good for
inking, and 0% being a soft fade into the middle, good for airbrushes). Another way to define a
more complicated brush shape is to draw it black-on-white, select it with a marquee tool, and use
"Edit » Define Brush". Remember that there will be a controller for diameter in the Brush's
options bar, so you won't have to define many different brushes that are just the same except for
different diameters.
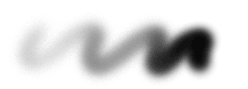
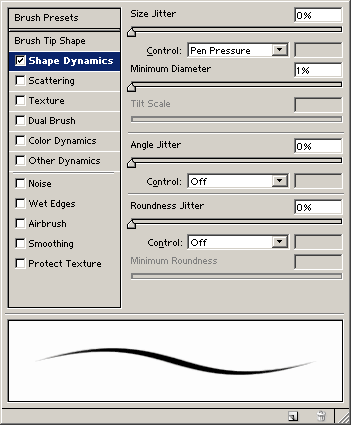 The rest of the pages control some new features to the brush system. The shape dynamics page to the
right is definitely the most useful one. See how my example stroke is tapered at both ends? That's
because the size control is set to "Pen Pressure". With a brush like this, if you have a drawing pad,
size will vary depending on how hard you're pressing down on the stylus. Other information about the
stylus, such as angle and tilt, can be assigned to parameters of the brush, giving you great control
over the penstrokes you can make.
The rest of the pages control some new features to the brush system. The shape dynamics page to the
right is definitely the most useful one. See how my example stroke is tapered at both ends? That's
because the size control is set to "Pen Pressure". With a brush like this, if you have a drawing pad,
size will vary depending on how hard you're pressing down on the stylus. Other information about the
stylus, such as angle and tilt, can be assigned to parameters of the brush, giving you great control
over the penstrokes you can make.
Notice the "Jitter" sliders here. If one of these is up, the parameter it controls will be given a random value for every single step along a penstroke, so it can get some really interesting chaotic-looking bushes. These sorts of brushes aren't too useful for the plain inking we're about to do, but they can be wonderful for coloring and effect work.
The Shape Dynamics here is just the first page of these sliders. There's many more in "Scattering",
"Color Dynamics" and "Shape Dynamics". The effect of all these sliders can be plainly seen in the
stroke in the bottom of the window, so I won't go into much detail about them here. The other two
pages deserve some explanation. The "Texture" page seems like a failed attempt to copy a feature
from Fractal Design Painter, but it can be quite useful. It manipulates the parts of the brush that
are only partially solid to be more or less solid depending on a bitmap pattern, which can give your
strokes the illusion that they were made on textured paper. The "Dual Brush" page is just like the
"Brush Tip Shape" page, and lets you define a second brush that will be drawn along the same line as
the first. This can be useful for making complicated shapes from image-based tips.
 |
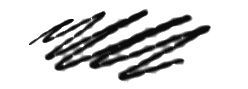
This one is a lot like the brush that's been in the sample stroke area in the screenshots above. | Diameter: 7px Hardness: 100% Spacing: 15% Shape Control: Pen Pressure |
 |
Here's an example of a brush with the "Texture" option used. | Diameter: 10px Hardness: 0% Spacing: 31% Shape Control: Pen Pressure Texture: Checkerboard |
 |
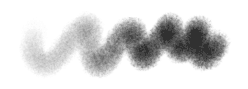
Here's a good example of a smooth airbrush. | Flow: 20% Diameter: 27px Harness: 0% Spacing: 1% Opacity Control: Pen Pressure Flow Control: Pen Pressure |
 |
Here's a spattering airbrush. | Flow: 50% Brush Tip: "Rough Round Bristle" Angle Jitter: 100% Size Jitter: 40% Flow Control: Pen Pressure |
| Back: Inking Basics | Home | Next: Freehand Inking |
| Skip Ahead: Getting Ready to Color |