| Al's Photoshop Tutorial | New Course (Versions 7.0 and above) |
First, be sure the Ink layer is selected, not the Sketch layer. If you draw while the Sketch layer is selected, the black lines you draw will be merged in with the sketch, and would be hard to separate again. Keeping the ink on its own layer makes it easy to simply turn off the sketch when it is no longer needed. The cartoon-cell analogy applies here too; it's like drawing on a separate sheet of acetate over the sketch.
Before we start inking, let's choose the brush we're going to use. If you have a drawing pad that senses pen pressure, you may feel tempted to use a brush like that first demo brush, that varies diameter to pressure, but I strongly recommend against that for your first few pictures. When we're done inking and it comes time to color, we're going to be filling in parts of the image based on boundaries set by where the pen lays down true black.
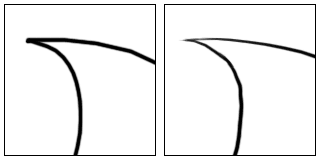
Here's a junction of two penstrokes. The one on the left was done with a normal brush, and the one on the right has its diameter controlled by pen pressure. They both look solid enough from here.
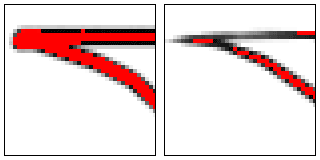
Here I've zoomed in 4 times and highlighted true black with red. In the non-dynamic example, the red forms a solid border. In the dynamic one, the red becomes sparse where the lines are thin. If we were to try to color this, we'd have to spend time fixing the corner by hand. Imagine having to do this to every point where one brushstroke meets another throughout a picture. That's a lot of tedious work! Let's stay away from inking with dynamic brushes.
For my inking, I'm going to use a non-dynamic pen with a slight texture to give my lines a little bit of life. The nice thing about texture compared to dynamic radius is that it only affects the gray areas, and leaves the true black as-is, so when it comes time to color, it shouldn't mean any extra work. Once I have the brush that I want, I'm going to save it in the pulldown presets tab in the options bar.
 Untapered  Tapered |
Now, you can just draw. Unlike a real ink brush, here you have options to undo (Ctrl+Z) and erase the lines you draw. I usually keep one hand over the Undo keys when drawing. If you're new to this, keep in mind that using a mouse or drawing pad to draw won't come naturally the first time you try it. Like any tool, it may take some practice to get the hang of.
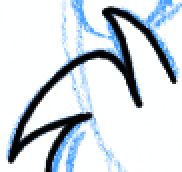
If you're working on something with fur or hair like I am, you may notice that some areas that are supposed to look fluffy may seem kind of dull, like in the snapshot labeled "Untapered" to the right. We can add a little extra snap to the edges here by drawing out past where we need to with the brush tool, and then narrowing the edges to a point with the Eraser tool. The Eraser tool (be sure you're not accidentally using the "Background Eraser" or "Magic Eraser") works just like the Brush tool, so give it a tip like the one you're using on the Brush tool. The effects of tapering our linework can be seen in the next snapshot, labeled "Tapered".
You should be able to go ahead and get a lot of your image inked now. But what happens if you run into
long, elegant lines that are hard to follow by hand? Or, what if you don't have a drawing pad, and your
mouse isn't doing exactly what you tell it to? Well, it's not nearly as fast, but there is a solution
that we'll learn about on the next page.
| Back: The Brushes Window | Home | Next: Path Inking |
| Skip Ahead: Getting Ready to Color |