| Back: Soft Color | Home | Next: Highlights |
| Al's Photoshop Tutorial | New Course (Versions 7.0 and above) |
We're going to shade with the help of a layer mode called Multiply. What multiply does is it darkens the layers behind it according to its color. I'll explain it here, but if you're not into the whole geek thing, feel free to skip the next paragraph.
How it works and why it's called multiply becomes apparent with a little computer color theory. For every pixel on each layer, the computer keeps separate values for Red, Green and Blue (or whatever color system your picture uses). Technically, it thinks of each value as a round number between 0 and 255, but for our mathematical demonstration, we're going to think of them as a decimal number between 0 and 1 (0 being pure dark, 1 being pure light). As any high-school graduate should know, when two numbers between 0 and 1 are multiplied together, their result is less than either of them, for example any number multiplied by .5 is half its original value. Now apply this to Photoshop layer thinking; anything below a multiply layer that's filled with 50% gray will have only half its original brightness. And since anything multiplied by 0 is 0, anything below a fully dark multiply layer comes out black; and since anything multiplied by 1 is itself, an image behind a white multiply layer are unchanged. There are other methods besides "Multiply" available to darken colors, but Multiply most closely mimics what actually happens in shading, so we're going to use that.

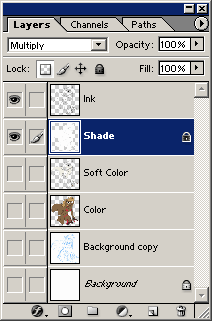
Anyway, down to business. Before we start to shade, we'll want to make a layer for it that will have white chunks of color where shading can be, and transparent elsewhere. Select your flat Color layer and duplicate it as "Shade", and then turn all layers off except for the shade layer. Now do the old trick again of selecting all the black with "Select » Color Range", but delete it this time. Deselect, and go to "Edit » Fill". Here, we'll turn all the remaining colors to white by using these settings: Use: White, Opacity: 100%, Mode: Normal; Preserve Transparency: On.
Now, since we want the shading to affect the colors but not the ink, go to the layers
window and drag it up above everything except Ink. We'll also want to be able to paint on
this layer freely without worrying about painting outside the color areas, so we're going to
lock the transparency. This is done by having the layer selected and clicking on the first
icon in the "Lock" icon list. A lock should appear next to the layer title, like the background
layer. Turn your ink and color layers on. When you change the Shade
layer's mode to "Multiply" (done in the box in the top of the layers window that currently
says "Normal"), the colors below should show through unaffected.
Your layers window should look something like the one shown on this page.

Now you can select black as your color, and use the an airbrush-style Brush tool to start shading, and remember that you can also use the Magic Wand to select some parts without others, which can be used to give objects that are next to each other but not touching some more visual depth.
One technique that I've found useful is to first shade with a very large
brush, making general shades, and then selecting smaller brushes later, going back with
details. You can also change your color back to white if you've shaded an area too much
and need to lighten it again. You can also go back and re-select areas you've already shaded
by switching to the flat "Color" layer, using the magic wand on the region you want, and switching
back to the "Shade" layer.
| Back: Soft Color | Home | Next: Highlights |