| Al's Photoshop Tutorial | Old Course (Versions 4.0 through 6.x) |
This method if inking can seem pretty intimidating at first. It can seem like a horrible, technical, time-consuming and complicated process. But, once you get a good sense of how to use the Pen tool, it really does come in handy, plus the lines it makes can be pretty much flawless.
First, be sure the Ink layer is selected, not the Sketch layer. If you draw while the Sketch layer is selected, the black lines you draw will be merged in with the sketch, and would be hard to separate again. Keeping the ink on its own layer makes it easy to simply turn off the sketch when it is no longer needed. The cartoon-cel analogy applies here too; it's like drawing on a separate sheet of acetate over the sketch.

If you hold the mouse down over the pen tool icon in the tools window, you should see icons for all of its modes. Since we'll be doing some relatively simple things with the pen tool, we won't need to worry about most of them. The ones we'll be dealing with will be Pen (the pen icon with no symbol near it, keyboard shortcut "P" in version 5) and Direct Selection (the one that looks like a mouse pointer, keyboard shortcut "A" in version 5). The Pen lets you lay down anchor points for the lines to follow, and the Direct Selection lets you edit these points.
The lines you are editing are stored temporarily as Paths. Take a look for the Paths window (Window » Show Paths). These paths are how the computer thinks of the lines when they are made of anchors and curves, before they are set into pixels.
 |
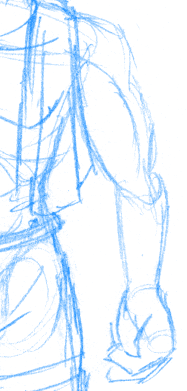
This is the section of the sketch I'll be working with. First, I select the "Paintbrush" tool, which is the tool that I will have the computer trace the lines with when I'm done, and set its brush to one that's only a few pixels wide, in this case 4 pixels. Then, I go back and select the Pen tool. |
 |
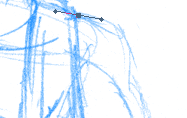
Clicking down places an anchor point. If you drag the mouse a little while the button is still down, you can set its starting direction. Here you see the anchor point (the grey box) and the line showing its direction, which for reference shoots out at an equal distance on the other side of the anchor. |
 |
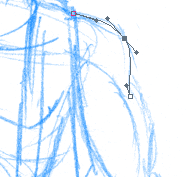
Now I have set up two more anchor points and angles. Once all the anchors are placed, I select the Direct Selector and zoom in to fine-tune them. Clicking on an anchor point with this shows its direction, and those of the anchors around it. You can move the anchors and the directions by dragging them. |
 |
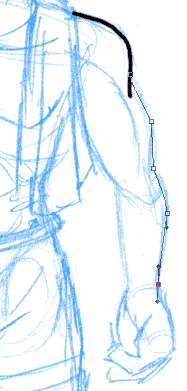
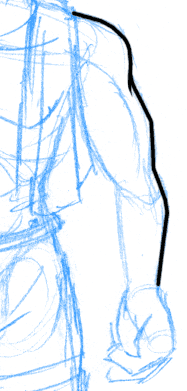
Once I have the line as I'd like it, I go into the menu on the Paths window and select an option called "Stroke Path..." This is the action that makes the computer run one of the drawing tools over the line we have just made. I always use the Paintbrush tool for ink lines. Once the path is put into pixels with this command, we no longer need it. This can be done by selecting "Delete Path" from the Path window menu, or by hitting the Delete key twice with one of the pen tools selected. These paths are very good for long and gently curving lines, such as the one that runs down the rest of the arm. In the snapshot here I've set up the anchor points for it. |
 |
I've used Stroke Path again, and deleted the path. I've also gone back with the freehand eraser tool in paintbrush mode with a brush just slightly larger than the one I used to make the lines, and deleted some of the excess from the first line, tapering it to a point. This tapering process is described in more detail below. |
Without tapering, all your lines would be the same width, which would give the image a very unprofessional look. To taper them, just draw your lines a little longer in the areas where single lines end, or where two lines come together at a sharp angle. Then go back with the eraser tool (set to "paintbrush" mode and with a similar brush) and erase the excess to taper your lines' ends to sharp points. You do this by starting the eraser in a blank area, near the line but a little back from its end. As you get closer to its end, bring the eraser in towards the center of the line. You may need to do this once on each side of the line. If you have a very unsteady mouse, try this: With the eraser, click once just off of the line as described above. Instead of dragging it in, release the button and move to the point. Hold down Shift and click again. The computer will erase in a perfectly straight line from your first click to your second. Here's what the face would look like without and with tapering:
Untapered: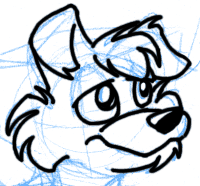 |
Tapered: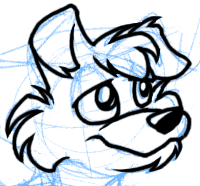 |
Also, keep in mind that while the pen tools method is good for the long, important lines, it should not be used for every line in the picture! It could be, but if your pictures tend to have many small lines like mine, you would simply be driven insane. These small lines don't need the detail of the longer ones, so you would be better off using a freehand method, even with a mouse, to draw them. Of course, if you have the means, I highly recommend buying a digital drawing tablet so more of the lines can be done freehand. But, even with my tablet, I find myself coming back to the Pen tool method for the long lines, usually the ones in the arms and legs.
| Back: Inking | Home | Next: The Freehand Method |
| Skip Ahead: Getting Ready to Color |