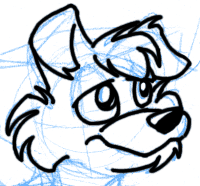
Untapered: |
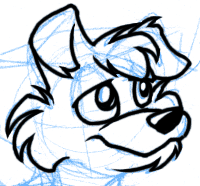
Tapered: |
| Al's Photoshop Tutorial | Old Course (Versions 4.0 through 6.x) |
This method is pretty straightforward and simple. It starts with the same first steps as the Pen Tools method:
First, be sure the Ink layer is selected, not the Sketch layer. If you draw while the Sketch layer is selected, the black lines you draw will be merged in with the sketch, and would be hard to separate again. Keeping the ink on its own layer makes it easy to simply turn off the sketch when it is no longer needed. The cartoon-cel analogy applies here too; it's like drawing on a separate sheet of acetate over the sketch.
Now select the Paintbrush tool. Pick a line width in the Brush window that is only a few pixels wide. In my examples, I use a 4 pixel brush. If you have a pressure-sensitive device like a Wacom Art Pad, Be sure the "Stylus:" options for the paintbrush tool in the options window are all deselected (See the Pressure-Sensitive method for more information).
Now, you can just draw. Unlike a real ink brush, here you have options to undo (Ctrl+Z) and erase the lines you draw. I usually keep one hand over the Undo keys when drawing. If you're new to this, keep in mind that using a mouse or drawing pad to draw won't come naturally the first time you try it. Like any tool, it may take some practice to get the hang of. The eraser can be used to erase part of a line if not all of it came out as you'd like, and it can also be used to taper the lines. This method of tapering is also covered in the Pen Tools method. If you're using a drawing pad that has an eraser-like nub on the top end of the stylus, it's likely that you can use that end to erase and the tip to draw.
Without tapering, all your lines would be the same width, which would give the image a very unprofessional look. To taper them, just draw your lines a little longer in the areas where single lines end, or where two lines come together at a sharp angle. Then go back with the eraser tool (set to "paintbrush" mode and with a similar brush) and erase the excess to taper your lines' ends to sharp points. You do this by starting the eraser in a blank area, near the line but a little back from its end. As you get closer to its end, bring the eraser in towards the center of the line. You may need to do this once on each side of the line. If you have a very unsteady mouse, try this: With the eraser, click once just off of the line as described above. Instead of dragging it in, release the button and move to the point. Hold down Shift and click again. The computer will erase in a perfectly straight line from your first click to your second. Here's what the face would look like without and with tapering:
Untapered: |
Tapered: |
Keep in mind that for very, very short lines, or lines that must be perfectly straight, the click/shift-click method described above also works with the paintbrush tool. Also, if you find yourself having difficulty getting the long, flowing lines to look right, you may want to study the Pen Tool method for computer-assisted lines.
| Back: Inking | Home | Next: The Pressure-Sensitive Method |
| Skip Ahead: Getting Ready to Color |