| Al's Photoshop Tutorial | Old Course (Versions 4.0 through 6.x) |
Okay, you should see the tools palette on the screen. If you don't, it can be found in the menus (Window » Show Tools). These are the tools you use to edit the current layer. Also, you should know that any tool that has a little arrow in the lower right corner of its box has more than one mode. You can click and hold over it to see all its modes.
In the tools window, you will notice that the tools are in separate divisions. The top four are tools for selecting areas. When an area is selected, it is shown as a rotating black and white dashed outline. Any actions you do only affect the selected area. Areas can be deselected in the menus (Select » Deselect) or with the keyboard (Ctrl+D). Here's what these tools do:
The other freehand drawing tools are useful in their own way, but are not needed for this tutorial. The next batch are computer-assisted drawing tools. Most of these are fairly self-explanatory, except for the pen tools, but they are explained in the Pen Tools inking style page.
The two tools below that are for panning and zooming around the picture. I tend to use the keyboard shortcuts instead. Holding down space and dragging with the mouse can pan around the picture, and zooming in and out is done with Ctrl+Plus and Ctrl+Minus.
The panel below that shows two overlapping colored squares. The one on top is the foreground color, which is the color which all the drawing tools use. The one in the rear is the background color, which is the color that the eraser uses on a layer that cannot be transparent. These colors can be changed by clicking on them (see below for more info on the color picker). The icon above and to the right of these squares exchanges the foreground and background colors. The one in the opposite corner restores them to Black on White.
Below that is another tool for selection and editing. These are Standard editing mode and Mask editing mode. You'll usually want to keep this in Standard editing mode, where the drawing tools affect the current layer. In Mask mode, the drawing tools draw on a red overlay, which becomes the selection when you change back to Standard mode.
Below this are the window modes. With these you can make the image you're working on appear in its own window, or fullscreen. I usually keep it in its own window.

Another window you'll need to have handy when drawing is the Options Window
(Window » Show Options). This window looks different depending on which tool you
select, and has all the options and modes of the tool spelled out.
Another good window to have is the Brushes window. Here you can select what size brush
the selected tool uses, which controls how thick the lines drawn with the drawing tools
are. Double-clicking on one of the shown brushes allows you to edit it, where you can
give the brush custom properties, which are all fairly self-explanatory, since as you
adjust them, a preview updates itself.
This window (only in version 5 and above) allows you to undo more than one action. The list
in the window shows the recent actions you've taken, the most recent on the bottom.
Clicking on previous steps undoes any actions done since that step. For users of
version 4 and below, only the most recent action can be undone, with the Undo command
(Edit » Undo or Ctrl+Z).
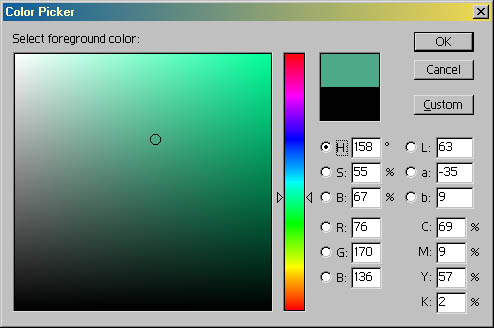
Above is the color picker mentioned before. You may be familiar with the concept of a Color Cube, which is that since any color can be made from three variables (such as Red, Green, and Blue, or Hue, Saturation, and Brightness) they can all be put into a three-dimensional graph. Well, of course since we don't have 3D displays, and even if we did, it would be impossible to see the insides of this cube all at once, we see a cross-section. In the image above, the large square of color ranges in saturation horizontally, and brightness vertically. The other variable, the depth of the cross section, in this case the Hue, is seen in the bar to its right, in this case green. You can change which variable is in the cross-section and which system the cube represents by clicking the buttons next to the values. H/S/V and R/G/B are the two systems I mentioned earlier. C/Y/M/K are not selectable because their four variables are too many to show as a cube. L/a/b color is an old system of describing color, based on how color for television signals is broadcast, by primarily giving Luminance for black and white, and two deviations from that luminance to specify color.
| Back: Inking | Home | Next: The Pen Tools Method |
| Skip Ahead: Getting Ready to Color |